The best AI stack for solo founders is not the biggest stack. It is the smallest stack that helps you build, remember, automate, and publish without turning your business into a SaaS subscription museum.
For most solo builders, that means four layers:Layer
Tool
JobBuild layer
Claude Code
Write code, inspect repos, create agents, ship pagesAutomation layer
n8n
Move data between tools, run repeatable workflows, trigger approvalsMemory layer
Obsidian or Notion
Store decisions, prompts, workflow notes, content ideasDistribution layer
Astro, MailerLite, YouTube, X
Turn build proof into searchable and social assetsHere is the move: pick one tool per job, then connect those tools around a weekly shipping rhythm.
The lean stack I would start with
Start with Claude Code, self-hosted n8n, Obsidian, MailerLite, and a simple Astro site.
That stack gives you:one place to build
one place to automate
one place to remember
one place to publish
one owned email channelYou can add tools later. But if you cannot explain what a tool does for revenue, distribution, or saved hours, it probably does not belong in the stack yet.
The stack should answer four boring questions
Before you add a tool, ask what question it answers:Question
Tool layer
Good answerWhat am I building?
Build
Claude Code can inspect the repo and make the changeWhat needs to happen again?
Automation
n8n can trigger, route, retry, and log the workflowWhat did I already learn?
Memory
Obsidian or Notion stores decisions and reusable promptsHow does this become trust?
Distribution
The site, email list, and social channels turn proof publicMost solo founders do this backward. They start with "what tool is hot?" and end up with seven disconnected dashboards.
Start with the work instead.
Claude Code is the build layer
ChatGPT is useful for thinking. Claude Code is useful for operating inside a codebase.
For solo builders, that distinction matters. Claude Code can inspect files, update pages, create scripts, and work directly in the repo. That makes it better for repeatable systems work: site updates, content pipelines, workflow docs, and internal tools.
Use Claude Code when:the task touches files
the system needs judgment
context matters
a page, script, workflow doc, or internal tool needs to change
you need the agent to read before it writesDo not use Claude Code as a recurring scheduler. That is not the job.
n8n is the automation layer
n8n is the automation layer. It should handle triggers, data movement, retries, and approvals.
Use n8n for:RSS scans
webhook intake
Notion or Airtable status changes
email list updates
content routing
scheduled checksDo not use n8n as the brain for every task. Let Claude Code or an LLM handle judgment. Let n8n handle the pipes.
That split matters because recurring automation breaks in boring ways: expired tokens, changed fields, failed webhooks, missing approvals. n8n is better at making those failures visible.
Obsidian or Notion is the memory layer
Your AI stack gets weaker when every decision is trapped in chat history.
You need a place for:reusable prompts
workflow runbooks
project decisions
content ideas
product notes
bugs and fixes
what you tried that did not workObsidian is great if you like local markdown and fast notes. Notion is great if your workflows already live in databases. Pick one. The expensive mistake is using both badly.
Distribution is part of the stack
A solo builder does not just need to build faster. You need to make the work visible.
That means the stack needs a distribution layer:Astro site for search pages and tools
MailerLite or ConvertKit for owned email
YouTube for proof and discovery
X or LinkedIn for fast feedback
free tools for search and AI visibilityThis is why I do not treat blogging as "content." A good search page is infrastructure. A useful calculator is infrastructure. A workflow page is infrastructure.
Where most solo founders go wrong: tools before workflow
They buy tools before they have a workflow.
The better order is:Do the task manually once.
Write down the steps.
Remove steps that should not exist.
Automate the repeatable pieces.
Keep a human approval step anywhere quality matters.That order saves you from automating a mess.
The $100-ish version I would run
Use the AI stack cost calculator if you want to model your own number, but the lean version looks like this:Category
Example setup
Monthly rangeAI assistant
Claude/Claude Code
$20-$100Automation
self-hosted n8n or starter plan
$5-$30Site
Astro on Vercel
$0-$20Email
MailerLite/ConvertKit
$0-$30Notes
Obsidian or Notion
$0-$15You can spend more. But the first goal is not a perfect stack. The first goal is a stack that ships proof every week.
A simple starter stack for solo builders
If you are starting today, use this:Claude Code for building and content ops
n8n for workflow automation
Obsidian for durable notes
MailerLite for email
Astro for the site
YouTube/X/LinkedIn for distributionThat is enough to run a serious one-person AI business without drowning in SaaS subscriptions.
What I would automate first
Do not automate your whole business first.
Automate the loop that creates distribution from work you already did:Capture a build note, video transcript, or workflow run.
Save it to your memory layer.
Generate one search page idea.
Generate one newsletter draft.
Generate 2-3 social posts.
Route everything for human approval.
Publish only the pieces that are actually useful.That gives you leverage without handing your brand to a content slot machine.
For prioritizing what to automate, use the automation priority audit. For content math, use the content flywheel ROI calculator.
FAQ
What is the cheapest AI stack for solo founders?
The cheapest useful stack is Claude Code, self-hosted n8n, Obsidian, and a static site. You can keep the recurring cost low while still getting serious leverage.
Should solo founders use Zapier or n8n?
Use Zapier for simple app-to-app workflows. Use n8n when you want self-hosting, lower marginal cost, and more control over multi-step automations.
Do I need a vector database?
Probably not at the start. Most solo builders need better files, cleaner workflows, and searchable notes before they need a custom RAG system.
What should I automate first?
Automate the repetitive workflow that directly supports revenue or distribution. Content repurposing, lead capture, research intake, and publishing approvals are good first candidates.
Is this stack enough to grow SEO traffic?
The stack is only the machine. Traffic comes from what the machine ships: useful tools, workflow pages, comparison posts, refreshed articles, internal links, and pages that answer real search questions better than the generic results.Want help mapping the lean stack to your actual workflow? Start here.
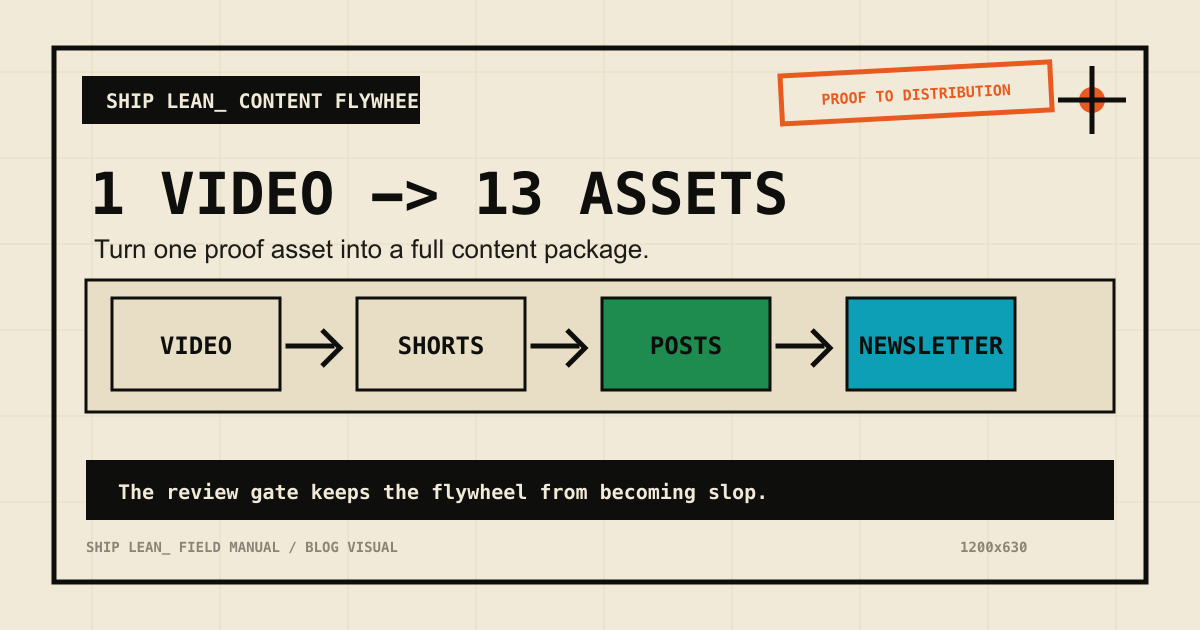
One YouTube video should not stay one YouTube video.
If you are a solo builder, every long-form video is proof. It can become Shorts, X threads, LinkedIn posts, a newsletter draft, and search pages.
The baseline Ship Lean flywheel is:Output
CountYouTube Shorts
7LinkedIn posts
3X threads/posts
2Newsletter draft
1Total
13The key is not "make more content." The key is to turn one real proof asset into multiple useful surfaces without flattening it into generic AI mush.
The workflow in one screenStage
Input
OutputCapture
YouTube video
transcript, timestamps, screenshotsExtract
transcript + notes
proof moments, claims, examplesPackage
proof moments
Shorts, posts, newsletter, search page ideaReview
drafts
approved assets onlyPublish
approved assets
social, email, siteMeasure
analytics
next topics and refreshesThat review step is not optional. It is what keeps the system from becoming an automated content landfill.
Step 1: Pull the transcript and receipts
Start with the transcript, not the video file.
You need:the raw transcript
timestamps
title
description
any notes or screenshots from the buildThe transcript becomes the source of truth. The screenshots and notes become the receipts.
Do not skip the receipts. They are the difference between "here is some advice" and "here is what I actually built."
Step 2: Find the proof moments
Do not clip randomly.
Find moments where something useful happens:a mistake gets fixed
a tool choice is explained
a cost is revealed
a workflow is shown
a before/after is obvious
a decision is madeThose moments become Shorts and social posts.
Use this filter:Moment type
Why it works
Asset fitMistake
People trust honest friction
Short, X postDecision
Helps builders choose faster
LinkedIn, comparisonBefore/after
Shows concrete progress
Short, newsletterCost/time
Makes the system real
Short, SEO sectionWorkflow
Gives them something to steal
Blog, workflow pageStep 3: Create the 7 Shorts from one idea each
Each Short needs one idea.
Good Short angles:"I tried X so you do not have to"
"This saved me Y hours"
"The mistake was not the tool"
"Here is the stack"
"Most builders skip this step"Do not end every Short with a CTA. Often the strongest ending is the verdict.
Good Short structure:First line names the pain or surprise.
Middle shows the proof moment.
Last line gives the verdict.Example:I thought the tool was the bottleneck. It was not. The bottleneck was that I had no approval step, so every automation either stalled or published junk.Step 4: Create 3 LinkedIn posts with different jobs
LinkedIn should not be a transcript summary.
Use:one tactical post
one lesson post
one build-in-public postThe tactical post teaches the workflow. The lesson post explains what changed your mind. The build-in-public post shows what you shipped.
Those are three different angles, not three rewrites of the same paragraph.
Step 5: Create 2 X posts or threads with sharper edges
X is the sharpest version.
Use:one atomic takeaway
one short thread with stepsIf it does not have a strong first line, it will die.
For X, cut the setup. Start at the tension:"Most content automation fails because it automates before it understands the workflow."
"Claude Code should not replace n8n. It should make n8n less painful to build."
"The best AI stack is usually the one with fewer tools and better handoffs."Step 6: Create the newsletter draft as a field note
The newsletter should feel like a field note:What I built
Why I built it
What broke
What worked
What you can stealThat format matches builders because it respects their time.
Step 7: Create one search page or tool idea
Every video should create at least one searchable page idea.
Examples:"Claude Code vs n8n"
"Best AI stack for solo founders"
"How to automate content repurposing"
"How much does an AI content system cost?"This is how your YouTube work becomes long-term search inventory.
Sometimes the search asset should be a tool instead of a post:cost calculator
automation priority audit
content flywheel ROI calculator
workflow checklist
stack selectorThat is why I like this system. Social gives you feedback fast. Search tools and workflow pages compound slowly.
The semi-automated version
Here is the version I trust:n8n detects a new YouTube video.
n8n saves the transcript, title, description, and URL.
Claude Code extracts proof moments and drafts assets.
The editor skill removes weak or generic assets.
A human approves the final pieces.
n8n routes approved assets to the scheduler/newsletter/site queue.Fully automated publishing sounds attractive. Semi-automated publishing is how you keep quality while still moving fast.
Want to sanity-check the value of the workflow? Use the content flywheel ROI calculator. If you are deciding whether this should be your first automation, run the automation priority audit.
Want help wiring this flywheel into your actual stack? Start here.
FAQ
How many assets should one YouTube video create?
Thirteen is a strong baseline: 7 Shorts, 3 LinkedIn posts, 2 X posts, and 1 newsletter draft.
Should AI fully automate content repurposing?
No. AI should draft, format, and route. A human should approve the final asset before publishing.
What tools do you need?
Claude Code for judgment-heavy drafting, n8n for routing and triggers, Notion or Obsidian for storage, and a scheduler for publishing.
Should every video become a blog post?
No. Every video should create a search idea, but not every idea deserves a full post. Some should become tools, workflow pages, refreshes, or internal notes.
You're paying for Zapier. ChatGPT Plus. Maybe a CRM you barely open.
And you're still copy-pasting the same data into the same spreadsheet every Monday morning.
It's not a tools problem. You've got plenty of those. The real issue is nobody showed you how to map what you're actually doing before throwing software at it.
You're tool-rich and system-poor. Stacking automation subscriptions that don't talk to each other, running in parallel instead of in sequence.
And every Sunday night, you're staring at the week ahead knowing a chunk of it will disappear into the same repetitive tasks you did last week. And the week before.
I know because that was me. Most of what's on this site got built around a day job. The workflows, the agents, the content systems - all of it in the margins. Early mornings and late nights.
And the process that actually worked didn't start with a tool. It started with a 30-minute brain dump.
Here's the process I use to figure out what to automate, how to map it, and which tools to pick. No hype. No $500 courses. Just the system I keep returning to - the one that turned a pile of manual work into a content operation that runs while I focus on building.
Let's build yours.
If you already know the workflow is worth automating, the next question is tool fit. Use the Automation Priority Audit to score it, then use Claude Code vs n8n to decide what should handle judgment versus triggers.
Why Most "Automate Everything" Advice Falls Flat
Every automation tutorial starts the same way: pick a tool, connect two apps, watch the magic happen.
But here's the thing... that's like buying a gym membership and expecting muscles to show up.
The advice skips the hardest part: figuring out what you're actually doing all day. Most solo builders can feel the drag, but they can't always name the workflow. They know they're busy. They know tasks repeat. But if you asked them to write down every step of their content process - from idea to published post - they'd stare at a blank page.
You can't automate what you haven't defined.
I tried. I jumped straight into n8n, started wiring up nodes, and ended up with a tangled mess that took longer to maintain than the manual process it replaced. The tool wasn't the problem. I was building before I understood what I was building.
Turns out, the boring part - documenting your processes - is the part that makes everything else work. Skip it and you'll waste weeks building automations you'll never use.
Here's what actually works. It starts with a notebook, not a tool.
The 30-Minute Brain Dump That Changes Everything
Block 30 minutes. That's it. Grab a notebook, open Notion, use your phone's notes app - doesn't matter. Just start listing every task you do in your business.
Not the high-level stuff like "marketing" or "sales." The actual tasks. The substeps. The clicks.
How to Do ItList every task by category. Content creation. Email. Social media. Admin. Customer service. Sales. Whatever applies to you.
Break each task into substeps. Don't write "create blog post." Write: research topic, outline, write draft, edit, find images, format in CMS, write meta description, schedule, share on social.
Note how long each takes. Even rough estimates help. "45 minutes" is better than "a while."
Mark what repeats. Weekly? Daily? Every time you publish?Pro tip: talking is faster than typing. I use a voice recorder app and walk through my business process out loud. Twenty minutes of rambling surfaces tasks I'd never sit down and type out. Dump the transcript into a doc and clean it up later.
The goal isn't a perfect document. It's getting everything out of your head so you can see the full picture for the first time.
Most people are shocked by how much they're actually doing. That's the point. You can't fix what you can't see.How to See Your Workflows Before You Build Them
Once you've got your task list, pick the top 3 most time-consuming categories. These are where automation will have the biggest impact.
Now draw them out. Seriously.
Use Excalidraw (free), Miro, or literal pen and paper. For each process, map the flow:Start (what triggers this task?)
Steps (every action in order)
Decision points (if X happens, then Y)
End (what's the output?)I used to jump straight into n8n. Open the canvas, start dragging nodes, figure it out as I go. It worked... until it didn't.
The breakthrough came when I started sketching in Excalidraw first. Sometimes with Claude Code helping me brainstorm. I'd lay out the entire workflow visually before touching a single automation tool.
Here's what I learned: 10 minutes sketching saves 4 hours rebuilding.
You catch the overcomplicated parts on paper. You spot redundant steps. You realize some tasks don't need automation at all - they just need to be eliminated.
The best automation is the one you don't build because you realized you didn't need it.
Spend 10 minutes per workflow. Sketch it rough. It doesn't need to be pretty. It needs to be honest.
Let AI Find the Patterns You're Too Busy to Notice
Here's where it gets interesting.
Take your brain dump - all those tasks, substeps, time estimates - and feed them into NotebookLM (powered by Gemini). This is a free tool from Google that's ridiculously good at pattern recognition.
Upload your notes, your workflow sketches, whatever you've got. Then prompt it:Identify the top 10 most repetitive processes in my business. Rank them by estimated time spent per week.NotebookLM will create visual workflows, raw SOPs, even infographic-style breakdowns of your processes. It sees patterns you're too deep in the weeds to notice.
You can also use Claude Opus or ChatGPT for this. The key is having an AI look at your actual processes with fresh eyes. Not generic "automation ideas" - YOUR specific tasks, analyzed for repetition.
What you'll typically find: a small handful of processes eating most of your repetitive time. Those are your targets.
Once you know what to automate, you need to pick how. And this is where most people go wrong - choosing tools based on hype instead of use case. You can also build AI agents to handle more complex tasks once you've got the basics down.
Pick the Right Tool (Not the Hyped One)
I binge-watched "my tool stack" videos for weeks. Felt like everyone had figured it out except me. Every creator had a different setup, a different "must-have" tool, a different take on what's essential.
The truth is: your workflow is yours to build. Here's a framework for choosing based on what you actually need, not what's trending.Tool
Best For
Cost
Learning CurveZapier
Simple app-to-app connections
$69+/mo (grows fast)
LowMake
Visual multi-step workflows
$16+/mo
Mediumn8n
Complex workflows, self-hosted
Cost of a small VPS
MediumClaude Code
Content creation, building apps, orchestrating agents
Anthropic plan + API
Medium-HighNotebookLM
Research, SOPs, pattern recognition
Free
LowMy recommendation for solo operators: Start with n8n. Self-hosted on a $5.99/month Hostinger VPS, you get unlimited workflows with no per-execution fees. Compare that to Zapier at $69+/month where costs scale with every automation you add.
n8n is underrated. It handles scraping, data processing, API calls, and repetitive task automation like a champ. For content creation and building websites or apps, Claude Code is where I spend most of my time. Together, they cover about 90% of what a lean one-person business needs.
OpenCanvas is worth mentioning - it's phenomenal for complex orchestration. But it's also complicated and still buggy. I'd wait unless you're comfortable debugging.
Check out these 7 workflow examples to see what n8n actually looks like in practice before you commit.
The 7 Tasks Worth Automating First
Not all automation is created equal. Rough priority order, highest impact first - your numbers will depend on volume:Email sequences and follow-ups - Welcome sequences, follow-up drips, re-engagement. Usually the single highest-leverage automation for small businesses.Content repurposing - One blog post or video becomes a LinkedIn post, a thread, a newsletter snippet, and short-form ideas. Build once, run forever.Social media scheduling - Stop manual posting. Build an AI-powered social media workflow that drafts and schedules across platforms.CRM data entry - Every form submission, email reply, or meeting booking auto-populates your CRM. No more copy-pasting contact details.Meeting scheduling - Calendly or TidyCal connected to your CRM and email. Zero back-and-forth.Invoice and payment reminders - Awkward to send manually and easy to forget. Let the system handle it.Data backup and reporting - Weekly dashboards, metrics roundups, and backup routines that run without you thinking about them.Pick one from this list. Just one. Build that first. Then move to the next.What Automation Actually Costs and Saves
Let's set expectations honestly.
The shape, not the magic number:
The savings depend entirely on what you're already doing manually. Two people can both "automate content repurposing" and one saves five minutes a week while the other claws back half a day. Volume and current process drive everything.
What I can tell you from running this stack:Stack cost for a solo operator stays low when you self-host n8n and use APIs you only pay for when they run. Most of the heavy SaaS cost gets replaced by per-token API costs that scale with usage.
Setup is the front-load. Month one is mostly building. Month two is when the saved time starts showing up. By month three, each new workflow is faster because you've internalized the patterns.
It doesn't stay saved without maintenance. APIs change. Things break. Budget a small recurring window each week to fix what wobbled.If you want to run your own numbers before building, the Automation Priority Audit and the AI Stack Cost Calculator are the tools I'd reach for.
My Actual Setup: n8n + Claude Code + a Human in the Loop
Most of what's on this site got built around a day job, in the margins. That context matters - the stack was designed for someone with zero spare hours.
Here's how the pieces fit together:The hub: Notion database. Content ideas, task status, publishing schedule all live here.
The automation layer: n8n (self-hosted on Hostinger). Triggers, routing, retries, scheduled checks.
The judgment layer: Claude Code. Where prompts, brand rules, content logic, and code edits live.
The human: me, plus an operations assistant for the parts that still need a person. Anything that ships gets approved.Honestly, it's not set-and-forget. I'm constantly refining the workflows I rely on. They're never "done." If something breaks or slows me down, I fix it the same week.
That's the reality of automation nobody talks about. It's a living system, not a one-time build.
The Mistakes That Cost Me Weeks (So They Don't Cost You)
I've made every mistake on this list. Learn from mine so you don't make your own.
1. Building Before Validating
My first big project was a faceless YouTube channel. Relationship content. Reddit scraping. Auto-generated voiceovers. Took me 2 weeks to build.
I never used it.
I was interested in faceless YouTube as a concept, not passionate about the content. The automation worked perfectly. The use case didn't. Now I validate every idea before I build: "Will I actually use this? Does it solve a real problem in my actual workflow?"
2. Overengineering Everything
That same YouTube automation had 4 agents when it should have had 1. I built complexity because it felt impressive, not because it was necessary. Your first automation should be simple. One trigger, a few steps, one output. Ship it. Refine later.
3. Skipping Visual Mapping
Every time I've jumped straight into n8n without sketching first, I've regretted it. 10 minutes in Excalidraw saves 4 hours rebuilding. Every. Single. Time.
4. Not Testing in Small Batches
Don't build a 20-step workflow and hit "execute" for the first time. Build 3 steps. Test. Add 3 more. Test. This catches errors before they cascade.
5. Choosing Tools Based on Hype
I watched every "ultimate tool stack" video on YouTube. Felt like I was falling behind because I wasn't using the same 15 tools as everyone else. Plot twist... most of those creators switch tools every 6 months. Find what works for your workflow and ignore the noise.
Your Monday Morning Is About to Change
You don't need to automate everything this week. You need to automate one thing.
Here's your action plan:Tonight (15 minutes): Pick the one task that eats the most of your time
Tomorrow (30 minutes): Do the brain dump. List every substep.
This week: Feed it into NotebookLM. Let AI find the patterns.
Next week: Build one workflow in n8n. One.That's it. By Week 2, you'll have one automation running and a real read on what it's actually saving you. The number doesn't matter as much as the realization: the tool was never the problem.
The process was.
You've been working harder than you need to. Not because you're doing it wrong, but because nobody showed you this part first. Now you have it.
Start with the brain dump. Everything else follows.
If you need a place to begin with n8n, start with this beginner tutorial or grab ideas from these 7 workflow examples.
What's the one task you're going to automate first?
I spent 2 weeks building an automation I never used.
Four agents. Late nights after my day job. Reddit scraping, 11Labs voiceovers, Creatomate video stitching - a full faceless YouTube pipeline. The workflow actually worked. Videos would generate automatically from trending relationship posts.
And I never published a single one.
Turns out, I wasn't passionate about relationship content. I was interested in the theory of faceless YouTube, not the content itself. So I built a beautiful machine that sat there collecting digital dust.
Here's what I learned: Automation speeds up whatever you're doing. If you have a broken process, automation just makes it fail faster.
The problem wasn't my n8n skills. The problem was I skipped the part where I figured out if I actually needed this thing.
Sound familiar? Maybe you've spent a Saturday building a workflow that's supposed to save you hours. Then Monday comes, you're back at your desk, and that automation hasn't touched your real work.
That's what this guide is about. Not another "automate everything" tutorial. A framework for building automations you'll actually use, instead of weekend projects that quietly rot.
Here's the process-first approach I use now, after learning the hard way.
Why Most Automation Advice Fails (And Costs You Weekends)
You've heard the standard automation advice: "If you do something more than twice, automate it."
Sounds reasonable. Except it's not.
Here's the problem - that advice assumes the thing you're doing twice is worth doing at all. It assumes your process is already good. It assumes automation will magically make a broken workflow work.
The truth is, most people automate broken processes. Then they're confused when automation doesn't save time.
I've been there. I used to admire workflows with 100 nodes. Complex branching logic. Dozens of API calls. "Look at that beautiful automation," I'd think.
Now? I admire the simplest workflows that actually run. The 5-node system you use every week beats the 50-node masterpiece that never gets opened again.
But here's the thing about automation tutorials online: they teach you how to build, not whether to build. Nobody makes viral content about the workflow they decided NOT to create.
So you end up in a loop. Watch tutorial. Get excited. Spend the weekend building. Realize it doesn't fit your actual work. Feel frustrated. Repeat.
Another weekend gone. Nothing shipped.
The solution isn't more automation skills. It's a framework for deciding what to automate in the first place.
The Process-First Framework for Time-Saving Automation
After wasting those 2 weeks on my faceless YouTube system, I changed my approach completely. Now I follow a 4-step process before I ever open n8n.
Step 1: Justify the Use Case
Before building anything, I answer one question: What's the ROI?
Not vague "this would be nice" thinking. Actual numbers.
Here's how I calculate it:How many hours does this task take per week?
How many hours will the automation take to build?
What's the payback period?If a task takes 2 hours weekly and the automation takes 10 hours to build, that's roughly a 5-week payback. Probably worth it.
If a task takes 15 minutes weekly and the automation takes 20 hours to build? You're looking at an 80-week payback. Probably not.
Most people skip this math. They build because building is fun. Then they wonder why their calendar is still full.
Step 2: Document the Manual Process First
Here's a counterintuitive truth: you should do the thing manually before automating it.
Not forever. Just long enough to understand what you're actually doing.
I track tasks in a Notion database for 1-2 weeks before automating. I note:What triggers the task?
What are the actual steps?
Where do I make decisions?
What could go wrong?This documentation reveals the hidden complexity. That "simple" task you wanted to automate? It probably has 5 edge cases you'd only discover mid-build.
Finding those edges before building saves hours of debugging later.
Step 3: Sketch It Before Building
The breakthrough came when I started using Excalidraw before opening n8n.
I used to jump straight into building. Add a node. Add another. Get tangled in logic. Realize I needed to restructure. Waste 2 hours.
Now I spend 10 minutes sketching first. Just rough boxes and arrows showing:What triggers the workflow
What each step needs to do
Where decisions happen
What the final output looks likeSometimes Claude Code helps me brainstorm the flow. We'll talk through the logic together before I touch any automation tool.
The best part? Sometimes the sketch reveals that I don't need automation at all. The best automation is the one you don't build because you realized you didn't need it.
Step 4: Build the Minimum Viable Automation
My first n8n workflow had 4 agents when it should have had 1.
I was so excited about what was possible that I built everything. Reddit scraping AND script writing AND voice generation AND video editing AND publishing. All at once.
That's a recipe for something that never works reliably.
Now I build the smallest version first. One workflow that does one thing. Get it running. Use it for a week. Then add the next piece.
For content repurposing, I didn't start with a 10-step pipeline. I started with: blog post goes in, Twitter thread comes out. One input, one output. Everything else came later.
The 5 Automations That Actually Save Time for SolopreneursNot all automations are created equal. Some save a few minutes a week. Others claw back real chunks of your day.
These are the five categories I keep coming back to:
1. Content Repurposing
This is one of the highest-leverage automations I've built.
One piece of content becomes several. A blog post or video turns into a thread, LinkedIn post, newsletter section, and short-form ideas. Core ideas stay the same - just reformatted per surface.
Before automation: an hour per platform of manual rewriting.
After automation: one trigger, multiple drafts, then a short edit pass.
Want a version of this pipeline built for you? Record one long-form video a week, and the Content Flywheel handles drafts, scheduling, and the approval queue in your voice. See Content Flywheel DFY →
Related: How to Automate Social Media Posting with AI
2. Social Media Scheduling
Note: I'm not talking about automated engagement or auto-replies. That's a path to getting flagged and annoying people.
I mean scheduling posts you've already drafted. Batch your content, queue it up, let the scheduler handle timing.
Tools like Publer or Buffer make this dead simple. No custom n8n workflow needed - sometimes the right tool beats the custom build.
3. Email Triage and Filtering
I don't automate replies. Too risky, too impersonal.
But I absolutely automate sorting. Newsletters go to one folder. Client emails get flagged. Junk gets deleted on arrival. By the time I open my inbox, it's already mostly triaged.
Most email clients have this built in. Gmail filters, Apple Mail rules, whatever. The point is: automate the sorting, not the replying.
4. Meeting Scheduling
The back-and-forth of finding meeting times is pure waste.
Calendly or Cal.com handles this completely. Share a link, they pick a time, it's on the calendar. No "does Tuesday work? How about Thursday?"
This is a solved problem. Don't build a custom solution.
5. Client Onboarding Sequences
When someone becomes a client, there's a checklist: welcome email, project folder, CRM entry, intake form, kickoff call.
Automating that sequence means consistent, professional onboarding without you remembering each step.
Start with the welcome email. Add the rest piece by piece.
Related: 7 n8n Workflow Examples Worth Stealing
The "Should I Automate This?" FrameworkBefore building any automation, I run through these four questions:
1. Does this task repeat weekly (or more)?
If you do something once a month, the automation probably won't pay off. The build time rarely justifies the savings for monthly tasks.
Weekly or daily tasks? Those are automation gold.
2. Is the process already clear and working?
If you're still figuring out how to do something, don't automate it. You'll bake confusion into the system.
Do it manually until the process is solid. Then automate.
3. Will automation ACTUALLY save time, or just move complexity?
Some "automation" just shifts where you spend time. Instead of doing the task, now you're maintaining the workflow, fixing errors, updating triggers.
Be honest about total time spent, not just time on the original task.
4. Do I need human judgment in the loop?
Some decisions shouldn't be automated. Client communications, creative direction, anything with nuance.
Automation should handle the mechanical parts, not replace your judgment entirely.
If a task passes all four questions, it's a candidate for automation. If it fails any of them, think twice before building.
How to Build Your First Automation (The Right Way)
Ready to build? Here's the process I wish I'd followed from the start.
Pick ONE High-Impact Task
Don't automate five things at once. Pick the one task that:Happens most frequently
Takes the most time
Has the clearest processFor most solo operators, content repurposing or email sorting wins this test. If you're not sure where to start, here are 7 repetitive tasks worth automating first - plus the 30-minute brain dump that helps you find yours.
Sketch the Workflow
Open Excalidraw (it's free) and draw:The trigger (what starts the workflow?)
Each step (what happens next?)
The output (what does success look like?)Spend 10-15 minutes here. It saves hours later.
Choose Your Tool
For most automations, n8n is my go-to. Self-hosted, unlimited workflows, no per-execution fees.
Related: n8n Tutorial for Beginners: Your First Workflow in 15 Minutes
But sometimes the right answer is a dedicated tool. Calendly for scheduling. Publer for social posting. Don't build what's already solved.
Build the Minimum Version
Start with the smallest version that provides value.
If you're automating content repurposing:Version 1: Blog post → Twitter thread
Version 2: Add LinkedIn
Version 3: Add email
Version 4: Add imagesEach version works independently. You don't need version 4 for version 1 to save time.
Test with Real Data
Don't test with fake examples. Run your actual content through the workflow.
Real data reveals real problems. Edge cases you didn't consider. Formatting issues. API quirks.
Refine Based on What Breaks
Here's the part nobody talks about: debugging workflows is part of the game.
I run a small set of workflows regularly, and I'm constantly tweaking them. Something breaks, I fix it. Output isn't quite right, I adjust.
Automation isn't set-and-forget. It's a living system you maintain. Expect to iterate.
The good news: each pass makes the system more reliable. After a few weeks of tweaking, you end up with something that mostly runs itself.Want workflows like these delivered weekly?
I share the workflows I'm actually building and refining - what works, what breaks, what I'd do differently. No theory, just systems you can steal.
Start here →Real Automation Workflows You Can Copy
Here are three workflows from my actual system:
Workflow 1: Notion Content Hub → Multi-Platform Publishing
My content operation runs through one Notion database.
The flow:Write draft in Notion
Mark as "Ready to Publish"
n8n detects the status change
Claude reformats for each platform (Twitter, LinkedIn, email)
Content queues in Publer
I wake up to posts scheduledThe key: I still review before publishing. Automation does the heavy lifting, but I approve the final output.
Workflow 2: Blog Image Generation with Claude Code
Header images used to be a slog: open the design tool, fight the prompt, drag it into the right folder. Now:Claude Code reads the blog post
Generates image prompt based on content
Calls a Gemini image API
Saves to the right folderI run it, walk away, come back to a header. Most of the wall-clock time is the API.
Workflow 3: YouTube Script → Multi-Format Content
One long-form video becomes multiple assets:Script goes into the system
Pull key points for Twitter thread
Create LinkedIn article summary
Generate newsletter section
Draft TikTok hook ideasCommon Automation Mistakes (I've Made Them All)
Learning from my failures so you don't have to:
Mistake 1: Automating Before Understanding the Process
This was my faceless YouTube disaster. I automated a process I hadn't validated. Two weeks of work for zero output.
Now I do things manually first. Understand the task. Document the steps. Then automate.
Mistake 2: Building 4 Agents When You Need 1
My first n8n workflow was comically overengineered. Reddit scraping, script writing, voice generation, video creation - all in one system.
Should have been one agent doing one thing well. (If you're building AI agents specifically, I wrote a complete guide to n8n's AI Agent node that shows how to build autonomous, tool-using workflows the right way.)
Start simple. Add complexity only when the simple version works.
Mistake 3: Set-and-Forget Mentality
The myth of "passive" automation. Build once, never touch again.
Doesn't work that way.
APIs change. Your needs evolve. Edge cases appear. Expect to maintain your workflows. Budget time for it weekly.
Mistake 4: Automating Things You Actually Enjoy
Not everything that CAN be automated SHOULD be.
If you enjoy writing Twitter threads, don't fully automate them. Maybe automate the formatting, but keep the creative part.
Automation should free you for work you enjoy, not eliminate the enjoyable parts.
Mistake 5: Ignoring Human-in-the-Loop
Full automation sounds great until you send a weird email to a client because an edge case slipped through.
Keep humans in the loop for:Client communications
Final approval before publishing
Anything with real consequencesAutomation handles the grunt work. You handle the judgment calls.
Tools I Actually Use (And Why)
After trying dozens of tools, here's what stuck:
n8n - Self-hosted on a small Hostinger VPS. Unlimited workflows, no per-execution fees. This is where most of my automation lives.
Claude Code - My most-used tool. Blog writing agents, image generation, workflow brainstorming. If I could only keep one AI tool, it's this one.
Notion - Central hub for all content. Everything flows through Notion databases. n8n watches for changes and triggers workflows.
Publer - Social scheduling. Could I build this in n8n? Probably. But Publer does it better than I could.
Excalidraw - Free workflow planning. Every automation starts as a sketch here.
The theme: use the right tool for the job. Sometimes that's a custom workflow. Sometimes it's a SaaS product. Don't build what's already solved.
Your First Automation Is One Decision Away
Most of what's on this site was built around a day job. Early mornings, late nights, weekends when I could swing it.
You don't need to quit your job to build automation systems. You don't need 40 hours a week. You need the right framework and the willingness to start small.
Here's the process again:Justify - Calculate the actual ROI
Document - Do it manually first, understand the process
Sketch - Map it in Excalidraw before building
Build - Start with the minimum version
Refine - Debug, iterate, improveThat's it. No complex methodology. No expensive courses. Just a system for building automations you'll actually use.
Pick one task. The one that eats the most time. Run it through the framework. Sketch it out.
Then build version one. Not the perfect version. The minimum version that works.
You'll save more time with one simple automation that runs reliably than with five complex workflows that never get finished.
Your future self is already running systems that work while you sleep. The only question is when you'll ship the first workflow that gets you there.
Build it this week.
I tried n8n a handful of times before it clicked.
Each time I quit because it felt too complex, too overwhelming, too... much. Authentication errors. Weird node configurations. Tutorials that assumed I already knew what I was doing. Everyone said n8n was "easy" and "just like Zapier but free" but I kept bouncing off it.
Then I picked one project I actually wanted to ship and committed to finishing it in n8n. The result was clunky. I built four agents where one would have done. But it worked, and that was enough for the model in my head to settle.
This is the tutorial I wish I'd had on attempt one: a setup walkthrough, three workflows you can build in a sitting, and the debugging tricks that turn "this is too hard" into "okay, I get it now."
What Is n8n? (And Why It's Worth Learning Even Though Zapier Is Easier)
n8n is a free, open-source automation tool that connects apps and services together. Think Zapier or Make.com, but you own it.
Here's the rough shape (always check current pricing - SaaS plans move):Feature
n8n
Zapier
MakeCost
Free self-hosted or paid cloud
Tiered, per-task
Tiered, per-operationWorkflows
Unlimited
Limited by plan
Limited by planLearning curve
Steeper
Easiest
MediumCustomization
Full code access
Limited
MediumExecution limits
None (self-hosted)
Plan-based
Plan-basedWhy people choose n8n:No per-execution fees (huge if you run workflows at scale)
Self-hosting means you control everything
Code nodes let you customize anything
Open-source community constantly adds integrationsWhy it's harder:
Zapier holds your hand. n8n expects you to figure some things out. Authentication setup is more manual. Error messages are less friendly. The first hour is rougher.
But here's the thing: once you get past the setup friction, n8n becomes your most powerful tool. You're not locked into pricing tiers. You're not limited by "tasks per month." You build what you need, exactly how you need it.
Worth it? For me, absolutely.
One important update: if you're using AI coding agents now, n8n is not the whole stack. It is the automation layer. I broke down the split in Claude Code vs n8n and the lean stack in AI stack for solo founders.Related Reading:7 n8n Workflow Examples for Content Creators
How to Automate Social Media with AIHow to Set Up n8n (2 Options: Cloud vs Self-Hosted)
You have two paths. Pick based on your comfort level and budget.
Option 1: n8n Cloud (Fastest)
If you just want to start building:Go to n8n.io
Click "Start for free"
Sign up with email
You're in. Start building immediately.Pros: Zero setup. Free trial. Good for testing.
Cons: Recurring fee. You're on their infrastructure.
Option 2: Self-Hosted on a small VPS (What I Use)
This is what I run. One-time setup, then you own the box.
What you'll need:A VPS like Hostinger (their entry-level plan is fine)
Basic command line comfort (I'll walk you through)Steps:Spin up a small VPS
SSH into your server
Install Docker: curl -fsSL https://get.docker.com -o get-docker.sh && sh get-docker.sh
Run n8n container: docker run -it --rm --name n8n -p 5678:5678 -v ~/.n8n:/home/node/.n8n n8nio/n8n
Access at http://your-server-ip:5678Some hosts now have one-click n8n installers, which makes this even faster. The manual Docker route is still short.
Why self-hosted: Unlimited workflows, no per-execution fees, full control. The trade-off is you own the maintenance.
First Login: What You'll See
You'll land in a blank canvas with a "+" button. This is your workflow editor. Don't panic - it's simpler than it looks.
Click the "+" and you'll see the node library. Over 400 integrations. Ignore most of them for now.
The 7 n8n Nodes That Actually Matter (Ignore the Other 400+)
n8n has 400+ nodes. I use the same 7 for 90% of my workflows.
Here's what I learned: You don't need to learn all the nodes. You need to master the ones you'll actually use.1. Schedule Trigger
Runs workflows on a schedule (daily at 9am, every Monday, etc.). Perfect for recurring automations.
2. Webhook Trigger
Lets external services trigger your workflow via URL. Foundation for Zapier-style integrations.
3. Code Node
Write custom JavaScript. This is where n8n becomes infinitely flexible. I use this constantly.
4. Switch Node
Routes data based on conditions (if status = "paid", do X; if status = "pending", do Y). Essential for complex logic.
5. IF Node
Simple true/false logic. Cleaner than Switch when you only need 2 paths.
6. Set Node
Formats data. Renames fields, extracts values, cleans up messy API responses.
7. Wait Node
Pauses workflow execution (wait 5 minutes, wait until specific date). Critical for timing-sensitive automations.
Bonus: AI Agent Node
Connects Claude, ChatGPT, and other LLMs directly into workflows. This is where workflows stop being "if-this-then-that" and start handling judgment calls. If you want to build agentic workflows that make decisions and use tools, check out my guide to building agentic n8n workflows with the AI Agent node.
Start with these. Once you're comfortable, explore the other 393 nodes. But you can build 90% of useful automations with just this core set.
Workflow #1: Gmail to Slack Notification (The "Hello World" of n8n)
Let's build your first workflow. Simple, practical, teaches the fundamentals.
What it does: When you get an important email, it sends a Slack notification instantly.Step-by-step:Add Gmail TriggerClick "+" → Search "Gmail Trigger"
Select "On Message Received"
Click "Connect my account"
Authorize Google (this is the authentication step everyone struggles with - just follow the OAuth flow)Add IF NodeClick "+" → Search "IF"
Set condition: {{ $json["subject"] }} contains "urgent"
This filters only urgent emailsAdd Slack NodeClick "+" → Search "Slack"
Connect your Slack workspace
Choose channel (e.g., #alerts)
Message: New urgent email from {{ $json["from"]["name"] }}: {{ $json["subject"] }}Test ItClick "Execute Workflow"
Send yourself a test email with "urgent" in subject
Check SlackWhat you just learned:Authentication (connecting Gmail + Slack)
Triggers (Gmail watching for new emails)
Data mapping (those {{ $json["field"] }} expressions)
Testing workflows before activating themCommon error: "Authentication failed" → Go back to the node, click "Reconnect", re-authorize. n8n's OAuth sometimes needs a second try.
Workflow #2: Daily Twitter/X Post Automation (Schedule Trigger + AI)
Now let's build something that runs on autopilot.
What it does: Every day at 9am, Claude generates an automation tip and posts it to Twitter/X.
Step-by-step:Add Schedule TriggerClick "+" → "Schedule Trigger"
Set to "Every Day" at 9:00amAdd AI Agent NodeClick "+" → Search "AI Agent"
Connect Claude API (you'll need an Anthropic API key)
Prompt: Write a 1-sentence automation tip for solo builders running lean AI businesses. Make it actionable and specific. No hashtags.Add Twitter NodeClick "+" → Search "Twitter"
Connect your Twitter account
Tweet text: {{ $json["output"] }}Activate ItClick the toggle in top-right: "Inactive" → "Active"
Your workflow is now live. It'll run every morning at 9am automatically.Key difference from Workflow #1: This one RUNS without you. Once activated, n8n executes it on schedule. You're not clicking "Execute" - it just happens.
What you just learned:Schedule triggers (time-based automation)
AI integration (Claude generating content)
Activating vs testing (live workflows vs manual execution)This is where automation starts to feel worth it. You build it once, then it runs unattended (until something upstream changes - which it will).
Workflow #3: Webhook to Google Sheets (Capture Data from Anywhere)
Final workflow: the foundation for advanced automation.
What it does: Create a custom webhook URL that receives data and saves it to Google Sheets. Use this for form submissions, Zapier alternatives, custom integrations - anything.
Step-by-step:Add Webhook TriggerClick "+" → "Webhook"
Method: POST
Copy the webhook URL (looks like https://your-n8n.com/webhook/abc123)Add Set Node (optional but recommended)Formats incoming data
Map fields: name = {{ $json["body"]["name"] }}, email = {{ $json["body"]["email"] }}Add Google Sheets NodeClick "+" → "Google Sheets"
Connect your Google account
Choose spreadsheet and sheet
Map columns to data fieldsTest ItUse Postman or curl to send test POST request:curl -X POST https://your-n8n.com/webhook/abc123 \
-H "Content-Type: application/json" \
-d '{"name":"Chris","email":"test@example.com"}'Check Google Sheets - data should appearWhat you just learned:Webhooks (HTTP endpoints you control)
Data transformation (Set node cleaning up messy inputs)
Google Sheets integration (foundational for so many workflows)This pattern matters. Most SaaS tools, form builders, and APIs can send webhook data. Once you understand this one workflow, the connectable surface area gets a lot bigger.Want more n8n workflows?
I send practical automation systems from the Ship Lean build - real workflows I'm testing, not recycled theory. No spam, unsubscribe anytime.
Get the free prompt pack →What Just Broke? The n8n Debugging Guide That Actually Works
You'll hit errors. Everyone does. Here's how to fix the most common ones.Error #1: "Authentication Failed"
What it means: The app connection dropped or expired.
Fix:Click on the node with the error
Click "Reconnect" or "Select Credential"
Re-authorize the app (OAuth flow)
Test againError #2: "Cannot Read Property of Undefined"
What it means: You're trying to access data that doesn't exist.
Fix:Click the node BEFORE the error
Look at the output data (bottom panel)
Check your expression: {{ $json["field"] }} must match actual field names
Use the "Expression Editor" (click the = icon) to see available fieldsError #3: "Expression Could Not Be Resolved"
What it means: Syntax error in your data mapping.
Fix:Common mistakes:
Missing brackets: {{ $json["name"] }} not {{ $json[name] }}
Wrong node reference: {{ $node["Node Name"].json["field"] }}
Typo in field nameUse the Expression Editor to validate syntaxMy 5-Step Debug Process:Execute one node at a time - Click "Execute Node" instead of "Execute Workflow"
Check the output panel - Bottom of screen shows exactly what data the node produced
Use the Code node to log data - Add console.log(items) to see what's actually there
Test with static data first - Use "Set" node with hardcoded values to isolate issues
Check the n8n community forum - Someone's hit your exact error beforeTurns out: Debugging is half the skill. Get good at reading error messages and checking data output, and you'll fix issues in 2 minutes instead of 2 hours.
How to Learn from 1,000+ Pre-Built Workflows (Without Copy-Pasting)
You don't have to build everything from scratch.
Where to find templates:
n8n.io/workflows - 1,000+ pre-built workflows
How to use them:Browse templates (filter by category: Marketing, Sales, Productivity, etc.)
Click "Use Workflow"
It opens in your n8n editor
Reconnect credentials (templates don't include your API keys)
Modify to fit your use caseBest templates for beginners:"Send Slack notification for new Gmail" - Teaches triggers + messaging
"Save form submissions to Google Sheets" - Teaches webhooks + data storage
"Daily weather report to email" - Teaches schedule triggers + external APIs
"Summarize web articles with AI" - Teaches AI integration + HTTP requestsHere's what I learned: Don't just copy-paste. Study how they built it. See how they structured nodes. Then adapt the pattern to your own workflows.
The template library is a masterclass in workflow design. Use it.
Lessons From Actually Using n8n
Here's what I wish I'd known on day one:
1. Plan First, Build Second
I used to jump straight into n8n. Bad move. Now I sketch workflows in Excalidraw first. 10 minutes of planning saves hours of rebuilding.
2. Only a Few Nodes Matter
You don't need to learn 400 nodes. Master the core 7-10. I still barely touch 90% of the library.
3. Find the Nodes You Enjoy
Some people love the Code node. Others prefer visual logic (IF, Switch). Figure out which style fits your brain and lean into it.
4. Give Yourself Permission to Fail
Not every workflow needs to be perfect. Some are stepping stones. My first automation (that faceless YouTube workflow) was clunky - 4 agents when it should've been 1 - but it taught me how the tool actually behaves.
5. Start with Templates, Then Customize
Templates teach you patterns. Once you understand the pattern, you can apply it anywhere.
6. Debugging Is Part of the Process
I used to think errors meant I was doing it wrong. Now I know: errors are just feedback. Read them, fix them, move on.
7. Self-Hosting Earns Its Keep Quickly
If you're going to run more than a couple of workflows, self-hosting n8n on a small VPS like Hostinger usually wins on cost vs per-task SaaS pricing. Unlimited workflows, no execution limits, full control. The trade-off is you own the box.
Callback: My first n8n project was a mess. But it worked, and that was enough to keep going. Ship something clunky. Refine later.
Your Next Steps: From Beginner to Builder
You've built 3 workflows. You know the core nodes. You can debug basic errors. Now what?
Immediate (Next 24 Hours):Build one of the 3 workflows above (pick the one you'd actually use)
Test it until it works
Activate it and let it runThis Week:Explore the template library - find 3 workflows you'd use
Customize one template to fit your exact use case
Break something, then fix it (seriously, debugging practice is how you learn)This Month:Build one automation that removes a recurring chore from your week
Examples:
Daily digest of top Hacker News posts → email
New blog post → drafted social posts, queued for review
Form submissions → auto-add to CRM + send confirmation emailOnce that's boring:Self-host n8n on your own server
Build multi-step workflows with more logic (Switch, Loop, Merge nodes)
Add an LLM step where judgment matters (see the n8n AI Agent tutorial)
Connect n8n to the rest of your stackRelated Reading:7 n8n Workflow Examples for Content Creators
How to Automate Social Media with AIYou're Not Behind - You're Right on Time
I tried n8n a handful of times before it worked. You might need two tries. You might get it on the first one. Doesn't really matter.
What matters: you now know how to set up n8n, build three working workflows, and debug the most common errors. That puts you ahead of most people who hear "n8n" and think "too complicated."
You have the tutorial. You have the workflows. You have the debugging checklist.
The only thing left is to actually build something. Pick one workflow from this guide. Build it. Break it. Fix it. Then build another.
Before you go full speed, read how to save time with automation without building systems you never use. It'll help you pick the right workflows first - the ones that actually pay off instead of sitting there untouched. And if you're not sure which repetitive tasks to tackle, here's my process for mapping your workflows and automating what matters.
If you'd rather skip the building and have a content workflow set up around your videos, Content Flywheel DFY is the done-for-you version.
Otherwise, start here and I'll send you the free prompt pack plus the next useful system I package.
My first n8n workflow was clunky, overcomplicated, and had four agents where one would have done.
But it worked.
That ugly pipeline scraped Reddit, wrote scripts, generated voiceovers, and stitched everything together with Creatomate. A faceless YouTube setup, built by someone who'd never touched n8n before. I never published from it - the real value was learning the tool.
Here's the thing about content work: the actual creative part is maybe 20% of the time. The other 80% is formatting, scheduling, cross-posting, research. The repetitive tasks that pile up before you even start writing.
n8n is the layer I keep coming back to for that 80%. Self-hosted, unlimited workflows, no per-task fees.
Quick caveat before the list: building the right automation matters more than building one well. I've burned plenty of weekends on systems I never used. Here's the framework I use now to decide what's worth automating - run any workflow on this list through it before you commit.
What follows are seven workflows I either run or have built. Treat the time and engagement notes as my own ballparks, not promises - your numbers depend on your volume and audience.
If you're deciding where n8n should sit next to a coding agent, read my Claude Code vs n8n decision rule first. n8n is best as the reliable trigger/routing layer, not the whole brain.Why n8n Over Other Automation Tools?
Before diving into the workflows, let me address the obvious question: why n8n?
I've tried them all. Zapier's pricing made me do math every time I wanted to automate something. Make (formerly Integromat) is solid, but the visual interface gave me headaches.
n8n hits different:Self-hosted option: Run it on a small VPS and skip per-workflow fees
Unlimited executions: No task counters
Visual workflow builder: See exactly what's happening at each step
Big integration library: Connect to most of the tools you already use
Open source: Community nodes cover the edge casesThe learning curve is real - plan on a weekend to get comfortable. But once it clicks, the per-workflow cost goes near zero. (New to n8n? Start with my beginner's tutorial that walks through the interface and your first workflow.)
Workflow 1: Content Repurposing Engine
What it's for: Stop manually rewriting the same idea into five formats.
This is the workflow that started it all. I write one blog post, and n8n transforms it into:3 LinkedIn posts (hook, insight, story format)
5 Twitter/X threads
1 YouTube script outline
1 newsletter sectionHow it works:Webhook triggers when I publish a new post
Claude API extracts key insights and quotable moments
Separate branches format content for each platform
Everything lands in my Notion content calendarWant more powerful AI integration? If you want to make Claude truly autonomous - not just generating content, but making decisions and using tools - check out my guide to building agentic workflows with n8n's AI Agent node.
The work is in the prompts. Generic "summarize this" prompts produce garbage. I keep iterating on prompts that match my voice and each platform's shape - it's never one-and-done. (Want to see the exact prompts I use? They're in my social media automation tutorial.)
Setup time: About 2 hours for the full pipeline
Key nodes: Webhook Trigger → Claude AI → Multiple branches → Notion API
Workflow 2: Social Media Scheduler with Engagement-Aware Timing
What it's for: Stop manually scheduling every post and stop posting at the same fixed time regardless of what's working.
I used to manually schedule every post. Now I batch-write and n8n handles the rest.
The twist: it doesn't just schedule - it nudges posting time based on past engagement.
How it works:Cron trigger runs daily
Pulls upcoming posts from my content queue
Checks past engagement data from my spreadsheet
Adjusts posting times to land closer to when my audience is actually around
Schedules via Buffer APIThe data-driven scheduling matters less than people think. The bigger win is just being consistent.
Setup time: 90 minutes for a basic version. Add the engagement layer once you have a few weeks of data.
Pro tip: Start simple. Get the basic scheduling working before adding the AI optimization layer. If you want the step-by-step build, see how to automate social media posts with AI.
Workflow 3: Trending Topics Monitor
What it's for: Stop endlessly scrolling for what's blowing up. Let the workflow shortlist it.
How it works:Scheduled trigger every few hours
Pulls from a few sources: subreddits I care about, X/Twitter trends, Google Trends
Claude scores each item for relevance to my audience
Filters by quality
Sends a Slack message with the top few opportunitiesThe real value isn't time saved - it's catching topics while they're still warm. Most won't be worth covering. The point is to surface the few that are.
Setup time: A couple of hours
Note: Reddit API requires developer access. The X API got expensive. Perplexity, news APIs, or RSS-based sources are reasonable alternatives.
Want a content flywheel built around your videos? If you'd rather skip the wiring entirely - workflow, voice prompts, approval queue - take a look at Content Flywheel DFY.Workflow 4: Email Newsletter Automation
What it's for: Cut the "blank-page Thursday" panic before sending a weekly newsletter.
My newsletter workflow is embarrassingly simple, but it removed the biggest weekly headache.
How it works:Every Thursday at 9 AM, workflow triggers
Pulls my top-performing content from the week (based on analytics)
Grabs any bookmarked links from my research
Claude drafts the newsletter with my structure
Sends draft to my email for reviewI still edit and personalize. But the 80% that's just assembly? Automated.
Setup time: 1 hour
Key insight: Don't try to fully automate newsletters. The personal touch matters. Automate the structure, not the soul.
Workflow 5: Research and Clipping Pipeline
What it's for: Stop losing the ideas that pop up at random times.
Every content creator has the same problem: ideas pop up at the wrong moment and disappear before you can use them.
This workflow captures everything.
How it works:Multiple entry points: email forwarding, Slack command, browser extension webhook
Everything funnels into a central processor
Claude categorizes, tags, and summarizes
Stores in Notion with full metadata
Weekly digest of unused clipsMy "content ideas" folder used to be a graveyard. With this in place, it's at least searchable and tagged - which is the difference between an idea I can find later and one I lose.
Setup time: 2 hours
The thing that actually matters: The categorization step. Without it, you just create a different kind of mess.
Workflow 6: YouTube Thumbnail and Title Testing
What it's for: Stop guessing at titles and thumbnails for every upload.
How it works:When I upload a video, the workflow triggers
Generates several title variations using Claude
Creates thumbnail text variations
Runs YouTube's built-in title test
Logs results to a spreadsheet for pattern analysisOver time, you build a small dataset of what actually works for your audience instead of generic "best practices" from a thumbnail course.
Setup time: A couple of hours
Requires: YouTube API access and some patience for data collection
Workflow 7: Content Performance Dashboard
What it's for: Stop opening five analytics tabs to figure out what's working.
This workflow doesn't create content. It tells me what's working.
How it works:Daily trigger at midnight
Pulls analytics from: Google Analytics, YouTube, Twitter, LinkedIn
Normalizes data and calculates week-over-week trends
Generates a Slack report with insights
Flags posts that need updating or promotionThe strategic value is hard to quantify. But having a single daily report instead of five tabs makes it more likely I'll actually look at the numbers.
Setup time: 3 hours (most complex workflow on this list)
Note: Analytics APIs can be finicky. Expect some debugging.
Getting Started: The Practical Path
Don't try to build all seven workflows this weekend. That's a recipe for burnout.
Here's what I'd recommend:
Week 1: Pick ONE workflow that addresses your biggest pain point. Build the simplest version that works.
Week 2: Refine that workflow. Add error handling. Test edge cases. Make it bulletproof.
Week 3: Add a second workflow. Build on what you learned.
Each workflow you finish makes the next one easier - you reuse credentials, prompt patterns, and debugging instincts. That's the real compounding, not a tidy hours-saved number.
The Honest ROI Picture
Let me be straight about what to expect:
Upfront investment:n8n learning curve: a weekend, give or take
Each workflow: a few hours to build, more to make reliable
Refinement: ongoingReturns:Less time on the boring 80% (formatting, scheduling, cross-posting)
Faster turnaround on ideas
Less burnout
A system you can keep editing instead of rebuilding from scratchWhat you don't get: a magic ratio. Time savings depend on what you're already doing manually. The compound effect shows up after a few months of running and tweaking, not week one.
Common Mistakes to Avoid
The repeating mistakes I see (and have made):Over-engineering from day one. Start simple. Add complexity later.No error handling. Workflows break. Build in notifications so you know when they fail.Generic AI prompts. The quality of your AI-powered workflows depends entirely on your prompts. Invest time here.Forgetting the human element. Some things shouldn't be automated. Editorial judgment, relationship building, creative direction - keep those human.Not documenting. Future you will thank present you for leaving notes about what each workflow does and why.What's Next
These seven workflows are the foundation I keep coming back to. They handle the boring parts so I can spend time on the parts that actually need a human.
Automation isn't about being lazy. It's about being strategic with the time you actually have.
Pick one workflow. The one that'll remove the chore you hate most. Build that this week.
Then come back and grab the next one.
More n8n Tutorials
Step-by-step guides with screenshots, prompts, and the patterns I use:Social Media Automation: How to automate social media posts with AI
Agentic workflows: n8n AI Agent tutorial
Stack split: Claude Code vs n8nGet the free prompt pack →
I used to spend Sunday nights batch-scheduling social media posts. Two hours minimum, every week, squinting at a calendar view while my actual work piled up.
Buffer plus Zapier, the whole deal. It worked fine until ChatGPT showed up and I started using it for headlines. Then I started hearing about "AI agents" and felt like I was already behind.
I tried CrewAI. Too technical. I tried n8n a few times and bounced. The nodes looked easy but it didn't click. I'd sign up, get frustrated, abandon it.
Then I picked one project I actually cared about and gave n8n one more shot. Took longer than it should have. Way more complex than it needed to be. But I finished it, and that's when the model in my head finally clicked.
Here's the thing about social media automation: the standard SaaS tools (Hootsuite, Sprout Social, Later) are mostly solving a scheduling problem. They don't draft anything. The leaner answer for solo builders is: own your draft layer with n8n + an LLM, and let a scheduler handle the rest.
This is the workflow I run for my own posts on LinkedIn and X. No coding background required, but you'll need a couple of hours to set things up.
Why Most Social Media Automation Fails
Before we build anything, let's talk about why your current approach probably isn't working.
The Buffer/Hootsuite trap: You're still writing every post manually. The tool just schedules it. That's not automation. That's a fancy calendar.
The AI content mill problem: Tools like Jasper or Copy.ai can generate posts, but they sound like... AI. Generic hooks, no personality, zero connection to your actual expertise.
The "set it and forget it" myth: Most automation breaks within weeks because nobody built in error handling or content variation.
Real automation means the system drafts, formats, and routes. A human still approves anything that ships. That's the pattern we're building.
The Architecture: How This Actually Works
Here's the 30,000-foot view of what we're creating:
Content Source (Blog/Newsletter)
↓
n8n Workflow
↓
Claude API (Content Generation)
↓
Platform-Specific Formatting
↓
Scheduling + Posting APIs
↓
Performance TrackingRough cost shape (your numbers will vary, check current pricing):n8n: free if self-hosted on a small VPS, otherwise paid cloud
Claude API: a few dollars a month at solo-builder volume
Platform APIs: usually free for posting from your own accountsThe point isn't "this is dirt cheap." The point is the cost scales with usage instead of with seats and feature tiers.What You'll Need Before Starting
Let's get the prerequisites out of the way:
Required accounts:n8n account (cloud or self-hosted)
Anthropic API key (for Claude)
Social platform developer accounts (Twitter/X, LinkedIn, etc.)Time investment:Initial setup: 2-3 hours
Testing and refinement: 1-2 hours
Ongoing maintenance: 15 minutes/weekTechnical skills:Basic understanding of APIs (I'll explain as we go)
Comfort with drag-and-drop interfaces
Patience for initial debuggingIf you've never touched n8n before, I'd recommend starting with my n8n Tutorial for Beginners to learn the fundamentals. Then check out my 7 n8n Workflow Examples for inspiration on what to build.
Step 1: Setting Up Your Content Source
Every good automation starts with a trigger. For social media, that trigger is new content.
Option A: Blog Post Webhook
If you're automating social posts for blog content (my recommendation), set up a webhook that fires when you publish:In n8n, create a new workflow
Add a Webhook node as your trigger
Copy the webhook URL
Add it to your CMS's publish hook (Astro, WordPress, Ghost all support this)Option B: Manual Content Queue
Prefer more control? Use a Notion database or Google Sheet as your content source:Add a Schedule Trigger node (runs every hour)
Connect to Notion or Google Sheets node
Filter for items marked "Ready to Post"Option C: RSS Feed
Already have an RSS feed? Even simpler:Add an RSS Feed Trigger node
Point it at your feed URL
Set check interval (I use every 30 minutes)For this tutorial, I'll use Option A since it's the most automated approach.
Step 2: Connecting Claude for Content Generation
This is the core of the workflow. We'll use Claude to turn your blog post into platform-specific drafts.
Note: This tutorial uses the HTTP Request method for Claude API calls. If you want a more powerful approach, check out n8n's AI Agent node which handles tool attachment and autonomous decision-making - I cover it in detail in my guide to building agentic workflows with the AI Agent node.
Add the HTTP Request node:Create an HTTP Request node after your trigger
Set method to POST
URL: https://api.anthropic.com/v1/messages
Add headers:
x-api-key: Your Anthropic API key
anthropic-version: 2023-06-01
content-type: application/jsonThe prompt that actually works:
Here's the prompt structure I use - generic prompts produce generic content. This one is shaped around platform conventions and voice:
{
"model": "claude-sonnet-4-20250514",
"max_tokens": 1024,
"messages": [
{
"role": "user",
"content": "You are a social media editor for a solo builder who teaches automation. Transform this blog post into social media content.\n\nBlog Title: {{$json.title}}\nBlog Summary: {{$json.description}}\nKey Points: {{$json.excerpt}}\n\nCreate:\n1. One LinkedIn post (hook + insight + CTA, 150-200 words)\n2. One Twitter/X thread (5-7 tweets, first tweet is the hook)\n3. One short-form post for Threads (casual, 50-100 words)\n\nRules:\n- Use 'you' and 'I' language\n- Include specific numbers when available\n- No hashtag spam (max 3 per platform)\n- Sound human, not corporate\n- Each piece should stand alone (don't assume reader saw the blog)"
}
]
}Why this prompt works:Role context: Tells Claude who it's writing for
Structured output: Three distinct formats in one call (saves API costs)
Specific constraints: Word counts prevent rambling
Voice guidelines: Matches my brand's casual-but-expert toneStep 3: Parsing and Formatting the Output
Claude returns a single text block. We need to split it into individual posts.
Add a Code node:
const response = $input.first().json.content[0].text;// Split by platform headers
const linkedinMatch = response.match(/LinkedIn[:\s]*([\s\S]*?)(?=Twitter|$)/i);
const twitterMatch = response.match(/Twitter[:\s]*([\s\S]*?)(?=Threads|$)/i);
const threadsMatch = response.match(/Threads[:\s]*([\s\S]*?)$/i);return {
linkedin: linkedinMatch ? linkedinMatch[1].trim() : '',
twitter: twitterMatch ? twitterMatch[1].trim() : '',
threads: threadsMatch ? threadsMatch[1].trim() : '',
originalTitle: $input.first().json.title,
publishDate: new Date().toISOString()
};This extracts each platform's content into separate fields we can route to different posting nodes.
Step 4: Platform-Specific Posting
Now we connect to each platform. I'll cover the three I use most.
LinkedIn Integration
LinkedIn's API requires OAuth 2.0, which n8n handles automatically:Add a LinkedIn node
Select "Create Post" operation
Connect your LinkedIn account (n8n walks you through OAuth)
Map the linkedin field from your Code node to the post contentPro tip: LinkedIn favors posts with line breaks. Add this to your Code node:
linkedin: linkedinMatch[1].trim().replace(/\n\n/g, '\n\n\n')Twitter/X Integration
Twitter's API has gotten complicated (thanks, Elon), but it still works:Add a Twitter node
You'll need Twitter API v2 access (apply at developer.twitter.com)
For threads, you'll need multiple tweets linked by reply_to_tweet_idThread posting logic:
// Split twitter content into individual tweets
const tweets = twitterContent.split(/Tweet \d+:/i).filter(t => t.trim());// First tweet posts normally, subsequent tweets reply to previous
let previousTweetId = null;
for (const tweet of tweets) {
const response = await postTweet(tweet.trim(), previousTweetId);
previousTweetId = response.data.id;
}Threads/Instagram Integration
Meta's Threads API is newer but straightforward:Add an HTTP Request node (Threads doesn't have a native n8n node yet)
Use Meta's Graph API endpoint
Requires Instagram Business account linked to Facebook PageHonestly, Threads posting is still finicky. I sometimes fall back to Buffer's free tier just for Threads while the API matures.
Step 5: Smart Scheduling (Not Just Random Times)
Here's where most automations get lazy. They post at fixed times regardless of when your audience is actually online.
Add engagement-based scheduling:Create a Google Sheets node that logs post performance
After 2-4 weeks, you'll have data on best posting times
Add a Code node that adjusts posting time based on historical engagement// Simple version: map day of week to best posting hour
const bestTimes = {
'Monday': 9,
'Tuesday': 10,
'Wednesday': 9,
'Thursday': 11,
'Friday': 10,
'Saturday': 11,
'Sunday': 10
};const today = new Date().toLocaleDateString('en-US', { weekday: 'long' });
const postHour = bestTimes[today];// Calculate delay until optimal posting time
const now = new Date();
const postTime = new Date(now);
postTime.setHours(postHour, 0, 0, 0);if (postTime < now) {
postTime.setDate(postTime.getDate() + 1);
}return {
delayMinutes: Math.round((postTime - now) / 60000),
scheduledFor: postTime.toISOString()
};Add a Wait node using the calculated delayThis is the lazy version. Once you have a few weeks of data, the real win is feeding actual engagement back into the pick instead of trusting a static map.Want more workflows like this?
I send practical automation systems from the Ship Lean build - real workflows, not recycled theory.
Get the free prompt pack →Step 6: Error Handling (The Part Everyone Skips)
Your workflow WILL break. APIs go down, rate limits hit, content gets flagged. Build for failure:
Add an Error Trigger workflow:Create a separate workflow with Error Trigger node
Connect it to a Slack or Email node
Include the error message, workflow name, and timestampAdd retry logic:
In your HTTP Request nodes, enable:Retry on fail: Yes
Max retries: 3
Wait between retries: 1000msAdd content validation:
Before posting, verify the AI didn't hallucinate:
// Basic sanity checks
if (content.length < 50) throw new Error('Content too short');
if (content.length > 3000) throw new Error('Content too long');
if (content.includes('undefined')) throw new Error('Template variable failed');
if (content.toLowerCase().includes('as an ai')) throw new Error('AI disclosure leaked');That last check catches when Claude accidentally reveals it's an AI. Instant credibility killer.
Step 7: Content Variation (Avoiding the Robot Sound)
Post the same format every time and your audience tunes out. Add variation:
Rotate content templates:
const templates = [
'hook_insight_cta', // Standard thought leadership
'story_lesson', // Personal narrative
'contrarian_take', // Challenge common belief
'how_to_quick', // Tactical tip
'question_engage' // Start with question
];const todayTemplate = templates[new Date().getDay() % templates.length];Adjust tone by platform:LinkedIn: Professional but personable
Twitter: Punchy, opinionated
Threads: Casual, conversationalInclude this in your Claude prompt:
Platform tone:
- LinkedIn: Write as a professional sharing industry insights. Use "we" occasionally.
- Twitter: Be direct and slightly provocative. Hot takes welcome.
- Threads: Super casual. Write like you're texting a smart friend.The Complete Workflow (Visual Overview)
Here's what your finished workflow looks like in n8n:
[Webhook Trigger]
↓
[HTTP Request - Claude API]
↓
[Code - Parse Response]
↓
[Code - Calculate Best Time]
↓
[Wait - Delay Until Optimal]
↓
┌──┴──┐
↓ ↓ ↓
[LinkedIn] [Twitter] [Threads]
↓ ↓ ↓
[Google Sheets - Log Performance]
↓
[IF - Check for Errors]
↓
[Slack - Notify on Failure]Total nodes: 10-12 depending on platforms.
Execution time and per-run cost depend on your model and volume - keep an eye on it for the first few runs instead of trusting a number from a blog post.
What Actually Changes When You Run This
The honest version of "before and after":Sunday-night scheduling stops being a 2-hour ritual. Drafts arrive in a queue. You edit and approve.
Posting consistency goes up because the system doesn't forget Tuesday exists.
Engagement is a coin flip until you have weeks of data. Some platforms will move, others won't. Don't promise yourself a number.What surprises most people: the AI-drafted posts aren't magically better. They're just more consistent and platform-shaped, which beats "skipped this week again."
Common Mistakes and How to Avoid Them
The pitfalls I keep seeing (and made myself):
Mistake 1: Over-automating
Don't automate replies or comments. That's how you get banned and lose authenticity. Automate distribution, keep engagement human.
The bigger trap is the opposite: building workflows so complex you forget how they work two weeks later. I've burned plenty of weekends on automations that no longer matched what I was actually posting. Start small.
Mistake 2: Ignoring platform limitsLinkedIn: Max 3 posts/day before reach tanks
Twitter: Rate limits are aggressive
Threads: Still figuring out optimal frequencyBuild delays into your workflow to respect these limits.
Mistake 3: No human review option
Add a "review before posting" path for high-stakes content. Use a Wait node with webhook resume, sending yourself a Slack message with approve/reject buttons.
Mistake 4: Generic prompts
"Write a social media post about this article" produces garbage. Be specific about voice, length, format, and platform conventions.
Mistake 5: Not tracking what works
If you're not logging performance, you can't improve. The Google Sheets logging step isn't optional - it's how you make the system smarter over time.
Extending the System
Once the basic workflow runs reliably, consider these additions:
Content repurposing: Connect to your content repurposing engine for even more automation.
Performance-based scheduling: After collecting enough data, use the social media scheduler with AI optimization approach.
Trending topic integration: Pull from your trending topics monitor to post about what's hot.
Image generation: Add DALL-E or Midjourney integration for auto-generated visuals - useful, though for solo builders I usually find a clean screenshot or diagram pulls more attention than a generic AI image.
Want a done-for-you content flywheel built around this? If you'd rather record one long-form video a week and have the workflow, prompts, and approval queue handled, take a look at Content Flywheel DFY.
FAQs
Q: Will this get my accounts flagged as spam?
Not if you post reasonable volumes, keep quality up, and don't auto-reply or auto-DM. Posting drafts you've reviewed from your own account is the same risk profile as scheduling them in any other tool.
Q: What about Instagram/Facebook?
Doable, but Meta's API requirements are stricter. You need a Business account and approved app. Worth it if those platforms matter for your business.
Q: Can I use GPT-4 instead of Claude?
Yes. Just swap the API endpoint and adjust the prompt format. I prefer Claude for this use case because it follows formatting instructions more reliably.
Q: What if I don't have a blog to repurpose?
Adapt the trigger. You could use a Notion database of content ideas, a Google Doc of weekly topics, or even manual input through n8n's form trigger.
Q: Is this "cheating" at social media?
Every major brand uses automation. The difference is whether your automated content provides real value or just adds noise. Focus on the former.
What's Next
You now have the blueprint for a lean social media drafting system that scales with usage instead of seats.
But reading about automation doesn't automate anything.
Here's the order I'd actually use:First: Set up n8n (cloud trial or self-hosted, your call) and get a Claude API key
Then: Build the basic webhook → Claude → draft → review flow for one platform
Then: Add a second platform once the first is boring and reliable
Then: Add error handling, logging, and any scheduling smartsStart with one platform. Get it boring. Then expand.
The compounding is real. Every post the system drafts is time you'd otherwise spend staring at a blank composer. Every Sunday you don't burn on scheduling is one you can spend on the work that actually moves the business.
If you'd rather get the whole flywheel running without sinking weekends into it, Content Flywheel DFY is the done-for-you version. Otherwise, start here and I'll send you the free prompt pack plus the next useful system I package.
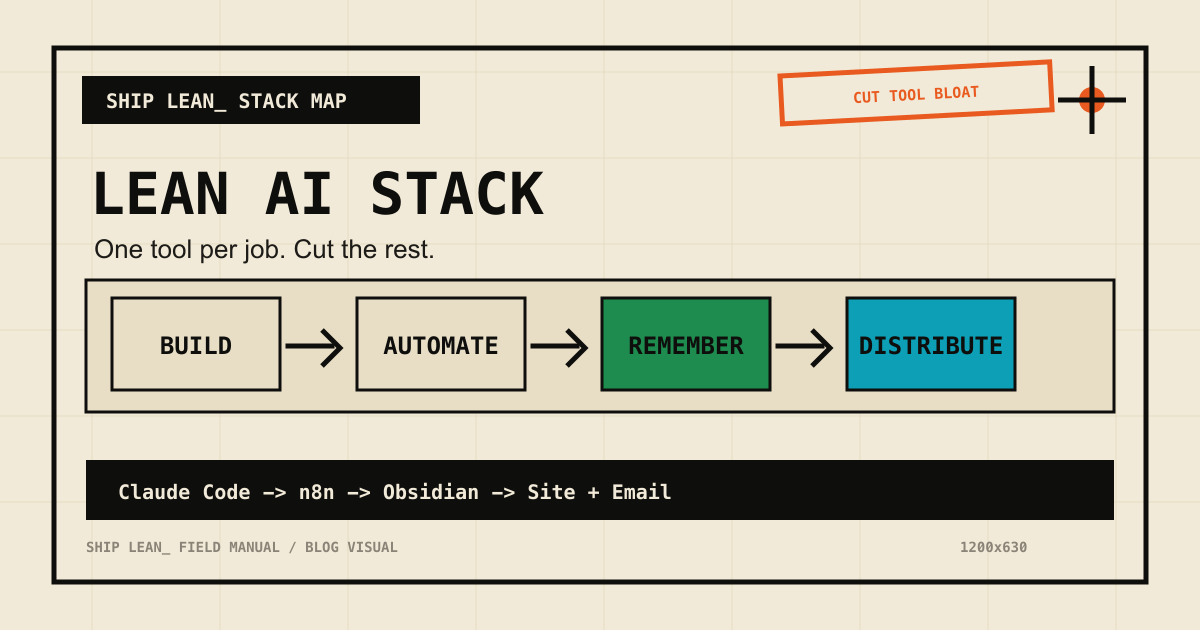
 Chris Alarcon